
ABBA - Why Did It Have To Be Me Chords
Before you play, tune your guitar and use the tools below to set up your view and flow. Using the Transpose tool, switch to D key to play this song with easier chords.
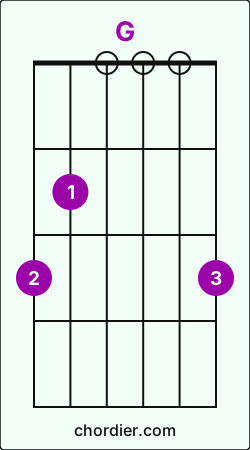
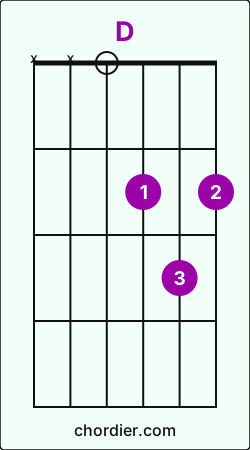
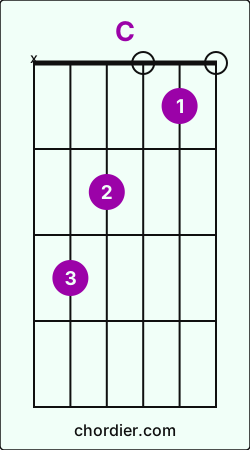
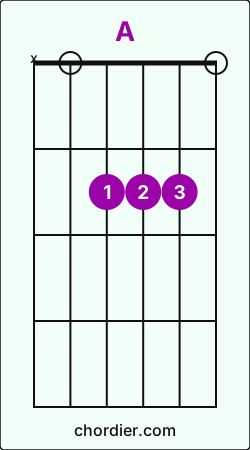
How to play Why Did It Have To Be Me on Guitar (Step-by-step)
ABBA - Why Did It Have To Be Me on guitar requires 5 chords and 8 core chord transitions. You can find the full step-by-step guide below. Before you start, tune your instrument. The song uses the ↓↑-↓↑-↓↑-↓↑ pattern; practice it muted first, or simplify to downstrokes while you learn the changes.
Why Did It Have To Be Me uses these transitions most often: G → D (13), D → G (11), and G → C (5). These transitions may feel a little challenging at first, but with steady practice you can play this song quickly.When you are ready, begin with G - D chord transition.
1. G → D chord transition
Switching from G to D:
- Lift your index finger from A string fret 2 and place it on G string fret 2.
- Slide your middle finger from E string fret 3 to E string fret 2.
- Lift your ring finger from E string fret 3 and place it on B string fret 3.
This transition appears in the verse, played 13 times.
2. D → C chord transition
To move from D to C:
- Lift your index finger from G string fret 2 and place it on B string fret 1.
- Slide your middle finger from E string fret 2 to D string fret 2.
- Lift your ring finger from B string fret 3 and place it on A string fret 3.
This transition appears in the verse, played 4 times.
3. G → C chord transition
To move from G to C:
- Lift your index finger from A string fret 2 and place it on B string fret 1.
- Slide your middle finger from E string fret 3 to D string fret 2.
- Lift your ring finger from E string fret 3 and place it on A string fret 3.
This transition appears in the chorus, played 5 times.
4. C → A chord transition
To move from C to A:
- Lift your index finger from B string fret 1 and place it on D string fret 2.
- Slide your middle finger from D string fret 2 to G string fret 2.
- Lift your ring finger from A string fret 3 and place it on B string fret 2.
This transition appears in the chorus, played 4 times.
5. A → G chord transition
Switching from A to G:
- Lift your index finger from D string fret 2 and place it on A string fret 2.
- Slide your middle finger from G string fret 2 to E string fret 3.
- Lift your ring finger from B string fret 2 and place it on E string fret 3.
This transition appears in the chorus, played 4 times.
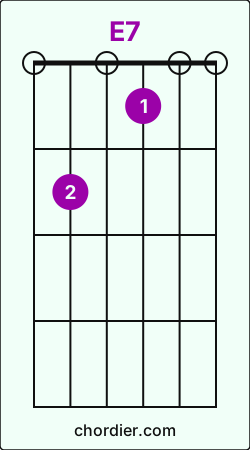
6. A → E7 chord transition
To move from A to E7:
- While playing A, lift your ring finger from B string fret 2.
- Lift your index finger from D string fret 2 and place it on G string fret 1.
- Slide your middle finger from G string fret 2 to A string fret 2.
This transition appears in the verse, played 3 times.
7. E7 → D chord transition
To move from E7 to D:
- Slide your index finger on G string from fret 1 to fret 2.
- Slide your middle finger from A string fret 2 to E string fret 2.
- Place ring finger on B string fret 3.
This transition appears in the verse.
8. D → A chord transition
Switching from D to A:
- Lift your index finger from G string fret 2 and place it on D string fret 2.
- Slide your middle finger from E string fret 2 to G string fret 2.
- Slide your ring finger on B string from fret 3 to fret 2.
This transition appears in the outro.
Why Did It Have To Be Me chord transition analysis
A short, data-driven summary of the chord flow in Why Did It Have To Be Me.
- Why Did It Have To Be Me includes 58 chord transitions, 8 of them unique.
- These transitions represent 0.02% of all chord transitions in Chordier.
- Why Did It Have To Be Me contains 4 of the top 10 transitions across Chordier.
- These transition patterns show how Why Did It Have To Be Me connects to the rest of Chordier. Mastering them helps you move to similar songs faster.After G, the most likely next chords across Chordier are C (25%), D (24%), and Am (13%).
- G → C: 25%
- G → D: 24%
After D, the most likely next chords across Chordier are G (29%), A (17%), and Em (17%).- D → G: 29%
- D → A: 17%